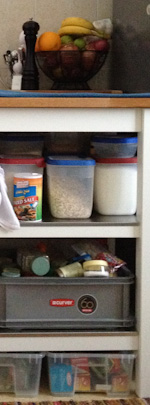
 The other day my friend Jenny sent out a call for help on Facebook. She needed to reorganize her kitchen and didn’t know where to start. Perhaps you can relate. And even though I can’t rush over and help her (or you) in the flesh, perhaps I can still help by sharing this technique.
I’ve read a lot about organizing over the years. I’m cluttery and messy and, in the past, have had a relatively high tolerance for a certain amount of uncleanliness. But I’ve always liked things to be organized. I like being able to find something when I need it and I like orderly appearances inside my cupboards and closets.
Nearly every single book or article I’ve read on the subject promotes some variation of what I’m calling “The ABC Principle” for functional organization. I’ve used it in many, many spaces over the years and promise you that it works works WORKS. You don’t need special containers or label makers or anything new. This is a principle. How you put the principle into practice is entirely up to you.
If you are an organizing genius, you can go ahead and stop reading now. There is likely nothing new here for you. Instead, please help the rest of us out by sharing your smarts in the comment section below. If, however, you have some spaces that aren’t working for you and don’t know where to begin. Read on, dear friends, read on.
The ABC Principle of Organizing
The gist of the ABC Principle is to put the most regularly used items in the most accessible spaces. Likewise, rarely accessed items go in the most inaccessible places. The ABC principle provides structure for thinking about your stuff.
I’m calling it “The ABC Principle”, because the idea is to categorize your available locations as A, B, and C; then categorize your items as A, B, and C; and then put like letters together. And also because I don’t know what else to call it.
First I’m going to explain the nature of ABC locations and items, and then I’ll give you an idea of how to use the principle to organize any space in your home. (Update: Commenter Bianca rightly noted how overwhelming this sounds. I’ve been detailed to not leave you lost, but the execution is much simpler than the explanation, I promise.)
A, B, and C Locations Defined
A – These locations are the very easiest to get to. They are at an arm’s reach from normal postures (standing at the sink, stove, or fridge in a kitchen; or sitting at a desk in an office). You should be able to reach them without straining or crouching or digging. “A” locations are golden real estate.
B – These locations are still relatively easy to get to, but not as ideal as “A” spaces. You might have to bend, reach, or dig a little, but no stools or gymnastics are required.
C – These locations are the most challenging to get to. Places like small cabinets over the fridge or top shelves or the garage.
A, B, and C Items Defined
A – Stuff that you use nearly every day
B – Stuff you use nearly every week
C – Stuff you use nearly every month.
Got it? Great. On we go.
You can put this principle into practice any way you wish. But I don’t want to leave you stranded without a place to start, so I’m going to show you how I do it. If it suits you, use it. If not, leave it.
An Example: My Crazy Kitchen
My kitchen is cuckoo. If you were to look really closely at my diagrams that follow – which I don’t recommend – it would not make any sense. This is because my kitchen doesn’t make any sense. It has two near-unusable cabinet spaces, three small drawers, and two large elevated concrete slabs. Ikea and I have become good friends.
Anyway, here we go. I’m going to walk you through the steps I use, give you a few notes on the process, and then summarize the whole thing into it’s simplest parts.
1) Sketch the space
The goal here is to gain a clear understanding of my space; to know what spaces are most usable, what spaces are most difficult, and to understand how I access the places I have available for things.
I draw a rough sketch of the space I’m organizing, be it the kitchen, a closet, the home office, whatever. Â The sketch is basic blueprint of the space, but with indicators of shelves and drawers and such. Nothing Fancy. It just helps me see what I’m working with. I like to do this part in pencil or black ink.
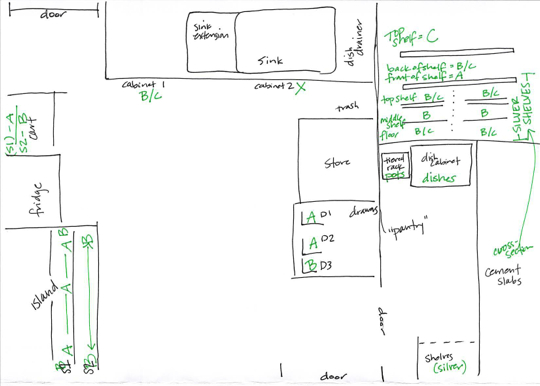
Here’s the sketch of my kitchen:

2) Mark locations as A, B, or C
Next, I take a different-colored pen and mark locations as A, B, or C. As you can see, if I’m not sure, I just use a slash. No need to overthink it.
I find the “A” and “C” spaces easiest to identify, so I mark those first and then fill in with “B”s or slashes.
Here’s my sketch marked up with As Bs and Cs:

3) Organize my stuff
Now that I know what I’m working with space-wise, I need to get items to their new homes.
I’m about to give you a detailed explanation, but don’t let the length discourage you. In practice it is quite simple. Just get moving. Soon you’ll have a big mess on your hands. But soon after that you’ll have a supremely functional space!
- I designate places to pile my stuff. “A” stuff on the counter here, “B” stuff on that counter there, “C” stuff on/around the dining room chairs I pulled in for that purpose. (As I mentioned in the decluttering post, I find that having all my sortables available without bending or stretching REALLY helps the process go quicker and smoother.)
- I empty my “A” locations, sorting into the designated piles as I go. I like to do this even if I end up returning things to the same location because I like to have a clean palette and clear slate and it lets me deep clean the spaces while I’ve already blown up the room anyway.
- I put away my “A” pile, remembering that these items should be ones that are used nearly every day. If they aren’t, I shift them to the “B” pile.
Note: For A & B items, I try to put things near where I use them. Cooking stuff and spices by the stove, glasses go near the fridge (because I can’t stand people criss-crossing the kitchen to get glasses and access the fridge), silverware somewhere near the dish drainer (no dish washers here, folks.) - I empty out my “B” locations and sort the items into their piles.
- I put away any new items from the “A” pile while keeping in mind the previous considerations.
- I start selecting “B” items for the “B” locations. From the “B” pile, I first select items I use the most and put them in the most accessible of the “B” locations. Then I fill out from there.
- I empty my “C” spaces and sort them into their piles.
- I put away new-found “A” and “B” items, adjusting as necessary.
- I put away my “C” items. Again, I start by selecting the items I use the most frequently and putting them in the most prime “C” spaces. (Or even leftover “B” spaces if I have them.) That way, if I run out of room in my kitchen (my kitchens tend to be small), the things that end up farther away are things I only use a couple times a year. And seriously, if my kitchen is functional on a day-to-day basis, I couldn’t care less about digging into the linen closet for my platters when I need them.
And that’s it! Though there are still a few other things worth mentioning.
A Few Notes…
- Make getting your hands on “A” things as easy as possible. This means no clunky lidded containers, no moving-this-to-get-at-that, no barriers. Remember, these are things you’re using every day.
- As you begin to put items in their new homes, consider the nuisance of pulling that exact thing out of that exact place. For instance, putting heavy things as close to the counter (or floor) as possible minimizes lifting. Consider visibility, too.
- Remember that this needs to work for you. Don’t think about what someone else would say is A/B/C space, assign locations according to your preferences. I hate bending down to get at stuff. So my lowest spaces are never “A”. I’d rather walk a few feet than bend and dig. But you should do according to your preferences.
- If you come across items that you haven’t used in the past year, put them aside in a pile. You should probably get rid of most of these. If you ever want it again you can get a newer model that you love and someone else can be enjoying this unused one in the meantime.
- This also goes for things that you have too many of. Save your faves and share a few with people who need them.
- If you have small-sized “C” items, you might be tempted to just throw them in a drawer in one of your “A” or “B” spaces. RESIST! That stuff just gets in your way and clutters up an otherwise-functional space. Instead, use a small container (I’m a big fan of clear plastic shoeboxes) and put that container in a “C” space.
- Over the next week or so, you may discover things that aren’t working for you. But because you now know where everything is, you’re primed to be able to adjust rather quickly if necessary.
Summary
Now that you have the nitty gritty details, here’s the simple summary I promised:
- Map out your space, labeling usable locations with the appropriate ABCs
- Starting with “A” locations, empty your spaces and sort items into separate A, B, and C piles.
- Wipe down “A” spaces while they’re empty, then put away “A” items into suitable locations, keeping in mind to put items near where they are most-frequently used.
- Repeat step 3, clearing and cleaning “B” locations (then putting away A&B items) next, and following last with “C” locations and items.
- Enjoy a clear and usable space!
I’d love to hear any questions, additions, or thoughts you have about the ABC Organization Principle. Still wondering about something? Have a method that works better for you? I’d love to know!
Check out the other organization and decluttering stuffs I’ve posted to the Project Grownup Facebook Page this past week. There are great ideas and advice from Zen Habits, The Happiness Project, and more.
I have to admit when I first read this I was so overwhelmed! But I let it sink in and then I realized I kind of already do a version of this, just not an intentional, well planned version. I decided to try it out – as an intentional strategy for our bedroom closet! I mentioned it to the hubs – in a super summarized version and told him I would like to try it. To my surprise, he suggested we do it together as a weekend project! Yahoo! I will have to let you know how it goes 🙂
Bianca recently posted..“I don’t have to go to church to be a Christian.”